


 Most Popular
 What's New
LocaChange iOS App User Guide
Welcome to LocaChange iOS App! In this guide, you'll learn how to change location on iPhone without using a computer each time you want to modify your location. Let's start.
Part 1: Quick Video Guide
Part 2: Steps to Get LocaChange iOS App on Your iPhone
Method 1: For devices running iOS 26.4 or earlier
1 Get LocaChange iOS Assistant on your computer (Only for the first time use).
Due to system limitations, iOS users are unable to install location change apps directly on their iPhones. You need to use your computer to install LocaChange iOS Installation Assistant and get LocaChange iOS APP, which can change location on your iPhone.
Here is the download link:
Windows: https://download.locachange.com/ios-assistant_setup.exe
Mac: https://download.locachange.com/locachange-ios-assistant-mac_installer.zip
Make sure your system meets the requirements for use:
LocaChange iOS Assistant:Win 7- Win 11 & Mac OS 10.15 - Mac OS 15
LocaChange iOS APP:iOS 12 - iOS 16 & iOS 17.2 and above (iOS 18, 26 included)
2 Get LocaChange iOS APP via LocaChange iOS Assistant.
1) Launch LocaChange iOS Assistant on your computer and sign in to your Apple ID.

2) Connect your iPhone to the computer via USB and trust it, click to install LocaChange iOS APP.

3) Complete driver installation (required for iOS 17 users).

4) Wait patiently for a while. (Please ensure that your network is stable during the installation process)

5) Ensure that the LocaChange iOS APP has been successfully installed and follow the instructions within the program to complete the trust process (some devices or systems may not need to complete this step).


6) Scan the QR code or obtain iGoSpeed from the App Store.


3 Complete the configuration and change location. [Connect your iOS to a stable Wi-Fi]
Complete the following configuration for the first time you use it:
Step 1: Configure VPN via iGoSpeed
1) Open iGoSpeed and tap "Test Now".

2) Click "Accelerate" and complete the VPN configuration.

3) LocaChange iOS APP will be launched automatically after the acceleration. is completed.

Step 2: Change Your Location Now
1) Select the mode you want to change the location and click “Move” - Modified successfully (the first modification needs to complete the initialization, the process does not require you to operate)


The app is valid for 7 days. To ensure your normal use, please reinstall the app before expiration. You can view the remaining validity period in the [Personal Center] - [Expiration].

Method 2: iGo App (For devices running iOS 26.4 or later)
1 Installing the Profile
1) Download LocaChange Desktop: On first use, you'll need to install the LocaChange desktop app on your computer.
2) Download the latest PC version, launch the desktop app, connect your phone to your computer via USB cable, and tap the toolbox icon in the top right corner, then select "LocaChange iOS APP."

3) Enable Developer Mode (iOS 16 and above)

4) Tap "Install" to complete the profile installation.

5) After installation, follow the on-screen steps to install the app, scan with your device to open the setup page.

6) Go to the App Store to get TestFlight, then download and install TestFlight.

7) Return to the setup page, scroll down and tap "View in TestFlight" to get iGo-Markto. Once downloaded, you'll find "iGo" on your home screen.

2 One-Click VPN Setup
1) Connect to a stable Wi-Fi network.
2) Open iGo on your iPhone, go to My page — tap Feedback — enter LocaChange — enter your email and submit.

3) Reopen iGo — long-press on the map to select the location you want to modify — choose how you want to set the location — start VPN setup.

4) Configure VPN.

Tap [Allow], which will take you to [Settings]. Enter your password to configure VPN, then return to the app to start modifying your location.
5) Setup complete, start modifying your location.
For Multi-Device Usage: If you purchased the iOS multi-device plan and use multiple devices with iGo, the first time you log in on a new device, you'll need to select your device.
1) Complete iGo download and installation following Setup Guides 1 and 2 above.
2) Open iGo and log in to your account.
3) A [Device Selection] popup will appear. Select your current device from the list to proceed to the map interface.

4) If you don't see your device listed after logging in, some required files may be missing. In this case, go back to the PC app, download the latest LocaChange PC version — log in — go to the Toolbox — tap "Get iOS APP" — tap "Install Missing Files" — restart iGo — go to device selection to choose your device.
5) [Device Selection] Entry: You can change your device selection anytime in [Profile] → [Settings].

6) [Device Serial Number Query Guide]

Part 3: Modes and Features of LocaChange iOS App
Method 1 and Method 2 provide exactly the same modes and features. The only difference is the interface color theme (green vs. blue).
If you are using LocaChange via Method 2, you can confidently follow the feature guide below—everything works the same.
Mode 1 Teleport Mode
Teleport your location to any place which you have chosen. There are 3 ways of change location in Teleport Mode:
Method 1: Long press the map to select the location you want to change >> Select the mode you need & click it >>Modification completed.
Method 2: Input the address to search >> Select the location you want to change >> Select the mode you need & click it >>Modification completed.

Method 3: Input the coordinates to search >> Select the location you want to change >> Select the mode you need & click it >>Modification completed.

Mode 2 Jump Teleport Mode
Teleport in the order of your chosen locations.
Select the location you want to modify and long press on the map to
select Jump mode.
Long press the map to select the location information you want to teleport in sequence.

You can long press to select multiple location points. You can undo or clear the selected location point information through the button on the left.
- A. Manual jump: Clicking Move will automatically teleport your location to the next location. Click Next to jump to the next location. You can also click Previous to return to the previous location.
- B. Automatic jump: When turned on, it will automatically jump to the next location for you based on the cooling countdown. (you need to turn on the cooling mode first)
Mode 3 Navigation Mode
Simulate the travel mode you choose to change the location.
Select the location you want to change and long press on the map to select Navigation mode.

You can simulate route by switching between different travel modes.
You can drag the circle below the travel mode to customize the speed of movement.
Mode 4 Multi-spot Mode
Change targeting based on the order of locations you choose and the mode of travel you choose.
Select the location you want to change and long press on the map to select multi-point mode. Long press the map to select the location point information you want to navigate in sequence (you can long press to select multiple location points).

You can undo or clear the selected location information through the buttons on the left. You can drag the circle below the travel mode to switch the speed of movement.
Mode 5 Joystick Mode
Fake the virtual location by operating the joystick direction and changing the movement speed.
Select the location you want to change and long press the map to select joystick mode. Drag the center circle of the wheel to select the direction you want to move and lock it (you can drag the circle under the travel mode to switch the speed of movement).

Tips More Special Features
- Feature 1. Import GPX Files
- Feature 2. Cooldown Timer
- Feature 3. Manually Reset Location
- Feature 4. Pokédex
- Feature 5. PvP Rankings
- Feature 6. Automatically Generate a Route
- Feature 7. Pokémon Information Search
- Feature 8. Raid Battles Information Search
- Feature 9. PokéStops Information Search
- Feature 10. Gyms Information Search
- Feature 11. Research Information Search
- Feature 12. View Nearby Gigantamax Search
- Feature 13. View Nearby Route Tasks
- Feature 14. IV Calculator
- Feature 15. Virtual Go Plus: Auto-Catch Pokémon & Spin PokéStops
- Feature 16. PoKo Assistant Features
Feature 1. Import GPX Files
You can import your local GPX files, and we will automatically identify and match them to the corresponding pattern for you.
Click Import GPX file and select local file >> Automatically identify routes and match and modify positioning methods.

You can undo or clear the selected location information through the buttons on the left. You can drag the circle below the travel mode to switch the speed of movement.
Feature 2. Cooldown Timer
Shows you the required cooling time based on the distance from your modified position (Game users can avoid being detected by the platform by complying with the cooling rules).
Click the Cooldown Timer button on the homepage to turn it on. After turning it on, you will be shown the dynamic cooling time. If you don't want to show this mode, you can turn it off in your personal center.

Feature 3. Manually Reset Location
You can turn on the manual restoration of the true location in Personal Center - Settings. After turning it on, you can see the restore button on the homepage.

Feature 4. Pokédex
You can view Pokémon and raid battles information and search for specific Pokémon/raid battles.

Instructions
-
The list displays the latest Pokémon/raid Battles (hatched) data by default and sorts by distance.
-
The search supports multiple conditions but needs to be separated by space, for example: iv100 2000mi 096.
-
When searching without entering the distance condition, the Pokémon/raid Battles data near the current location will be displayed by default.
-
The search supports PvP: You can input lc/gl/ul+number to search for Pokémon with corresponding data, and switch to find Pokémon by order.
-
The supported search conditions are as follows:
- Name: e.g. [pikachu] - Search for Pokémon named pikachu. (English only)
- PokemonID: e.g. [025] - Search for Pokémon with PokémonID 025.
- LatLon: e.g. [40.719989, -73.996789] - Search for data within 10km of the specified coordinates. If you need to search for more data, please add distance conditions.
- IV: e.g. [iv100] - Search for Pokémon with IV value 100 and above.
- CP: e.g. [cp2000] - Search for Pokémon with CP value 2000 and above.
- Level: e.g. [lv30] - Search for Pokémon above level 30.
- Gender: e.g. [female] - Search for female Pokémon. (supports searching for male, female, genderless)
- Boosted: e.g. [boosted] - Search for Pokémon with weather bonus.
- Little Cup: e.g.[lc5]--Search for the top 5 Pokémon in Little cup
- Great League: e.g.[gl10]--Search for Graet Top 10 Pokémon in Laegue
- Ultra League: e.g.[ul5]--Search for top 5 Pokémon in Ultra League
- PokemonID: e.g. [146] - Search for raid battles with Moltres as the leader.
- Name: e.g. [pelipper] - Search for raid battles with pelipper as the leader. (only English is supported)
- Tier: e.g. [t5] - Search for 5 star raid battles.
- LatLon: e.g. [40.719989, -73.996789] - Search for data within 10km of the specified coordinates. If you need to search for more data, please add distance conditions.
- Mega: e.g. [Mega] - Search for mega raid battles.
- EX: e.g. [ex] - Search for exclusive raid battles.
- Hatched: e.g. [hatched] - Search for hatched raid battles. If not hatched, please search [egg].
- Boosted: e.g. [boosted] - Search for raid battles with weather bonuses.
Feature 5. PvP Rankings
A new PvP Rankings icon has been added to the Search page, providing quick access to rankings for three leagues: Little Cup (LC), Great League (GL), and Ultra League (UL). Each ranking list displays the Pokémon’s name, rank, and Pokédex number.

Tapping the catch icon on the right side of any entry in the ranking list will automatically take you to the Search page, where the corresponding Pokémon’s details and search results will be displayed. From there, you can easily switch to view other Pokémon you’re interested in.
Feature 6. Automatically Generate a Route
Click to automatically generate a route for you to visit all PokéStops near you.

Feature 7. Pokémon Information Search
You can click Track to view all locations of a specific Pokémon.

Feature 8. Raid Battles Information Search
You can click Track to view all locations of Pokemon GO raids.

Feature 9. PokéStop Information Search
You can see information about PokéStop within a 5km radius of you.

Feature 10. Gyms Information Search
You can click on a gym to view information about the Pokémon in the gym.

Feature 11. Research Information Search
You can click on a Pokemon GO Research to view details and rewards.

Feature 12. View Nearby Gigantamax Search
You can view nearby Gigantamax Pokémon information.

Feature 13. View Nearby Route Tasks
Click on a route to view the task location and required time, among other details.

Feature 14. IV Calculator
1. Click the Poké Ball icon at the top right corner of the map to expand related feature icons, then tap the IV Calculator icon. The first time you click the Poké Ball icon, you will see a guide for the IV Calculator.

2. Enter the IV Calculator to estimate the possible IV values of a Pokémon and to simulate powering up or evolving it.
(1) Calculate Possible IV Values of a Pokémon
User Guide:
Step 1: Go to the IV Calculator homepage. The first time you enter, you will see instructions on where to find the IV Calculator manual.

Step 2: Before uploading a Pokémon screenshot, select the corresponding language of the screenshot. Currently supported: English, Japanese, German, French, Korean, and Traditional Chinese.

Step 3: After selecting the correct language, upload the screenshot of the Pokémon you want to calculate IV for. The system will scan its basic data. You may edit the details and use the search bar to find the Pokémon’s name.

Step 4: Once the data is confirmed, click Confirm to calculate and get the results. Tap the down arrow button to view all possible IV values for the Pokémon.

(2) Simulate Power-Up and Evolution
Click Power Up to view simulated data for the powering up or evolution process.


Feature 15. Virtual Go Plus: Auto-Catch Pokémon & Spin PokéStops
Limitations of Virtual GO Plus:
-
Daily Spin Limit: You can spin up to 2,400 PokéStops per day. Exceeding this limit will prevent you from spinning any more PokéStops for the rest of the day.
-
Daily Catch Limit: You can catch up to 4,800 Pokémon per day. Once you exceed this, you will be unable to catch more Pokémon for the remainder of the day.
Instructions
-
Launch the latest version of Poko.
-
Enable Go Plus in iGo and wait for it to connect.
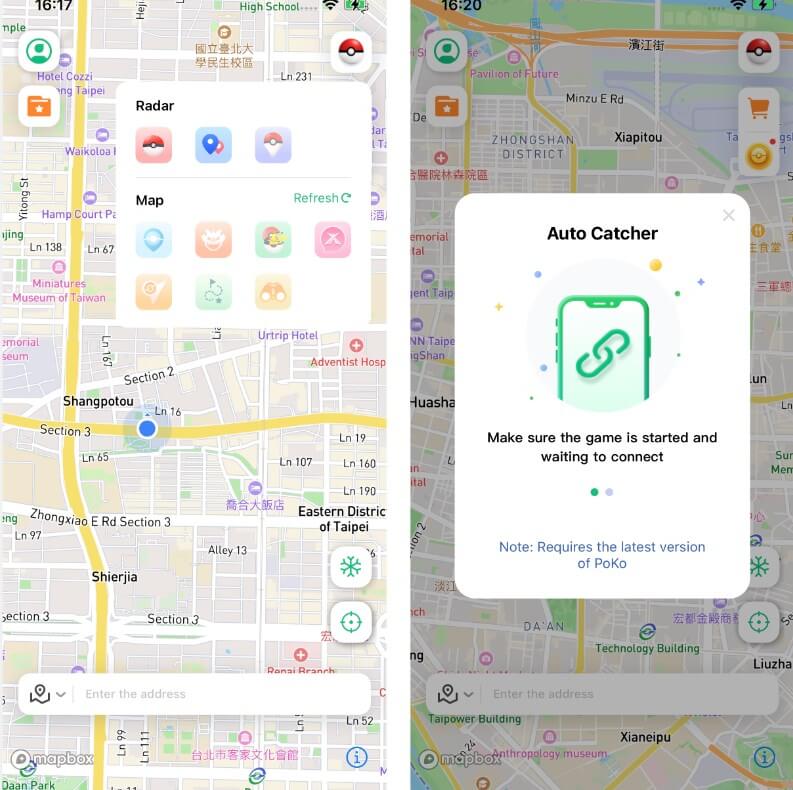
-
After a successful connection, complete the Go Plus configuration in the game.
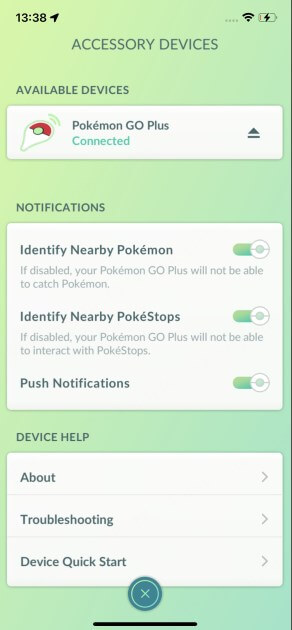
-
Change location and automatically catch.
Video Guide:
-
Virtual GO Plus Ball Selection Settings (Premium Feature)


Tap the GO Plus icon to enable the Virtual GO Plus feature. To switch Poké Balls, press and hold the GO Plus icon and select your preferred ball type.

Feature 16. PoKo Assistant Features (Premium Service)
The PoKo Assistant offers three premium automation features: Auto Raid, Auto-Rocket Battles, and Enhanced Throw.
Before using these features, make sure you have installed PoKo and enabled it on your device.

(1) Auto Raid
When you enter a Raid Battle, PoKo can automatically complete the battle for you.

(2) Auto-Rocket Battles
When you manually initiate a Team GO Rocket battle, PoKo allows you to skip the battle and proceed directly to the Pokémon encounter.

(3) Enhanced Throw
PoKo provides Enhanced Throw assistance and lets you choose the throw outcome you want to simulate.

If a feature disconnects or does not work as expected, try closing both the app and PoKo, then reopen them. You may also update PoKo to the latest version for better stability.